Drawer boxes for your cabinet is a place where you can keep it simple with pocket screws or brad nails or flex your skills a little and try for some joinery like dovetails or box joints. After much messing around making and buying various jigs for the router and table saw, we settled on box joints for our project. This provides a nice professional looking feature to your build, but it also adds time to the process.
Step 01. Determine Your Drawer Sizes
You will need lengths for your sides and front and rear panels.
Side Panels: The length of your drawer sides is the length of your drawer slides. For our project, we used 21-inch drawer slides. Easy enough, eh?!
Front and Rear Panels: The length of your front and rear panels depend on how you are connecting your boxes together. With box joints, the length of our front piece was the distance between the slides measured from their outside edges plus the thickness of our side piece. For the back, we used a butt joint, so the length was the distance from outside to outside edge of the drawer slides.
Drawer Box Height: The height of your drawers is somewhat of a personal preference. Because our drawers were large, our pieces were slightly under 10 inches so that I could cut six pieces from a sheet of 1/2-inch baltic birch plywood. You will want the height to be at least 1 inch shorter than your opening because the drawer box will sit slightly up on the undermount slides.
Step 02. Cut to Length
Armed with all you dimensions, it’s time to plan out your cuts taking into account the size of the material you’re starting with – we used 30×60 sheets of baltic birch as it’s really nice to work with and doesn’t have internal voids. We used our table saw to run boards through for a consistent width prior to cutting them to size (slightly under 10 inches so we could get 3 even strips.
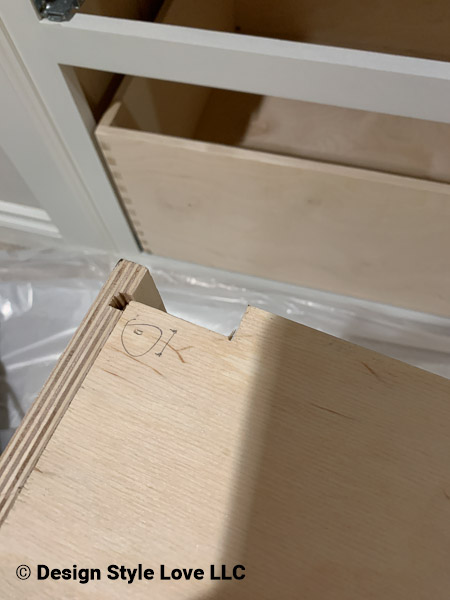
We then painstakingly cut-to-length all our near 10-inch pieces with a miter saw which required measuring, cutting, flipping, marking, and cutting again. Fun. Having a crosscut sled or sliding miter saw with a block stop would have been terrific and saved a lot of time. Maybe for our next project – also, ignore the box to the right in the picture below, it was my proof of concept to convince myself that I could actually do this.
TIP: For added strength with butt joints, it’s important to fit the front and back pieces inside of the side pieces. This way as you pull on the drawer you’re pulling cross-wise against the nails and not with the nails. See, smart – stronger.

Step 03. Cut Your Box Joints
We built a dado sled that formed the basis for mounting my box joint jig. The jig that you create will be clamped to your dado sled.
#01. Get your Dado Sled. See Here for How to Build One!
#02. Set your Box Joint Jig in Place. See Here for How to Create a Box Joint Jig!

#03. Cut your Box Joints. I always start with the front face placing the top side against the guide first. This way the top of my front drawer piece is solid and the box joints start 1/2-inch down.
#04. Test fit your box and make adjustments as needed.
Step 04. Cut Drawer Bottom Slots
With undermount drawer slides, the bottom of the drawer will sit 1/2-inch up from the bottom. I swapped my dado stack for my single blade and ran all the pieces through at 1/2-inch from the fence and about 1/4-inch depth. To get a tight fit, I moved the fence slightly and ran the pieces through until my 1/4-inch baltic birch drawer bottom fit snuggly in the grooves.
Step 05. Cut Drawer Bottoms
We ripped the 1/4 baltic birch down so that it would fit in the grooves we just cut in all our pieces. Not too complicated of a step here.
Step 06. Cut Tabs for Undermount Drawer Slides
On the back piece of each drawer a tab that is 1/2-inch high and 1-1/2 inches long needs to be cut from the bottom.


Step 07. Sand
Give everything a quick sanding while it’s not assembled. Be careful not to spend a lot of time on the box joint areas as you don’t want to take material from here.
Step 08. Assemble Drawers
The box joints got a nice coat of glue and were pressed together. Next, the drawer bottom was slid into place and the back piece was nailed into place. We then clamped the drawers to hold them square and in place for the glue to dry. For some of the drawers, we clamped scrap pieces of wood against the box joints to keep them in place while the glue dried. Yet another project where we needed more clamps. Make sure to wipe any excess glue from the inside of the drawers.

Once dry, unclamp and sand the box joints to make it nice and smooth.
Step 09. Install Undermound Slide Clips
On the underside front of the drawer the two undermount drawer slide clips get screwed into place. There are jigs to help with step, but I’ve never found the need for them. I use a long drill bit and press the clip against the side (they are left and right specific) and drill slowly. So far, never had a problem.
Step 10. Finish the Drawer Top
There are a couple of different ways you can finish the top of the drawers:
#01. Sand. Simple. Elegant-ish. Done.
#02. Fill and Sand. You can use some wood filler to fill any gaps along the top surface of the drawer box sides. Sand this down lightly for a smoother finish.
#03. Edge Band Veneer: To finish the top of the drawer box, you could always see here for how to install edge band veneer. This is how we finished our custom hall closet.
Step 11. Install the Drawers
Set the drawer on the slide and press it against the back of the drawer slides – there is a spiked piece that holds the drawer. Push hard enough that it creates a mark on the back of the drawer. Now drill a 3/8-inch hole that is about 7/16-inch deep. This needs to be done on both sides of the back of the drawer. Once drilled, you can install the drawer by putting it on the slide and pressing until you hear the front clamps click into place.


Tools
- Miter saw
- Try-Square
- Wood Glue
- Quick clamps, self-standing clamps, and F-clamps (never enough clamps)
- Orbital Sander
- Basics: pencil, blue tape, tape measure
- Cordless Drill
- Eye, ear, and hand protection
That’s it! On to building drawer faces and doors.


